A Bone Broth recipe for glowing skin and immune boost!
Disclosure: This post may contain affiliate links, meaning I may earn a commission if you click through and make a purchase, at no additional cost to you. I only recommend products or services that I personally use and trust.
Jump to RecipeFor centuries turmeric has been an ingredient revered for it’s wonderful anti-inflammatory and antioxidant benefits, and it is personally one of my favorite spices to ingest for glowing— non-inflamed—skin! Meanwhile, bone broth has also been a health secret for a long time but has only somewhat recently made a big name for itself in the health and wellness industry. Bone broth is known for helping your immune system as well as doing amazing things for your gut —like sealing its lining and healing it— therefore doing amazing things for your hormones, your skin, and much more. When consistently drinking bone broth I see huge— positive— differences in the hair skin and nails; my nails are longer and stronger, my hair is glossy and thick, and my skin is clear and healthy.
When I decided to borrow my moms pressure cooker and attempt my own broth I had no idea what I was in for. I knew all of the health benefits of bone broth and I had heard all of my favorite influencers and health guru’s singing its praises, but anytime I tried to sip on one from the store I absolutely HATED it. I’d try to choke it down but I’m an, undoubtedly privileged, foodie and that was near impossible for me. I’d try to add things to it, like soy sauce or hot sauce or herbs and spices but that wasn’t doing it for me either. So when I decided to do it myself my hopes were not high.
HOWEVER, I did it— and I loved it.
The thing about me is when I look up a recipe, I’m a classic skimmer. I read the ingredients and then I personally throw it together how I think it will best work and add or subtract things. It makes my friends furious when they try whatever I make and ask for the recipe and I just start throwing phrases like, “a little bit”, “a pinch of”. Anyways, this time around I decided to make a bone broth that nourished and healed both our skin and our gut and that’s how I ended up with my turmeric bone broth recipe, and yes, I did actually measure everything out and come up with a [hopefully] concise recipe. I hope you all love it as much as my family and I do!
Where do you get the chicken bones?
You can, and should, make this easy on yourself! I usually plan on making bone broth a few days after I make any sort of bone-in chicken. You can use thighs, drumsticks, wings, whatever works! The way I usually do this is with a whole chicken:
- I cook my whole chicken in my pressure cooker with 1 cup of chicken stock or broth in the bottom and lightly season the whole chicken with salt and pepper
- Once the chicken is in with its broth and seasonings I pressure cook it on high for 26 minutes if its thawed and 60 minutes if its frozen (these are 3 pound chickens I’m using so timing could vary depending on weight)
- After the chicken it done cooking, the pressure is released and its cooled down I take the chicken out (or sometimes leave it in the pot) and carve the chicken and set the meat aside in a container
- Once it’s carved and all thats left is the bones and a little bit of broth in the pot I just add in the rest of the ingredients for the bone broth and get it going! I already have the pressure cooker out and I’m already in the kitchen so might as well right!
Like I said, you can use whatever chicken bones you want and do what ever variation works for you! I also have friends that will use rotisserie chickens and use the bones from those!
Storing your bone broth
If you’re like me, you like to make a lot of anything at once to make my life easier later on. And if you aren’t, here are some helpful tips if you find yourself with bone broth you aren’t quite sure how to store!
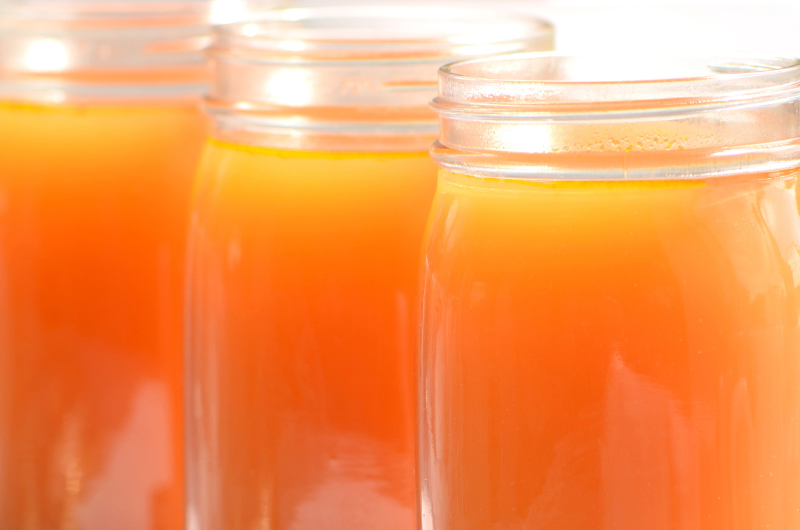
- Mason jars are my favorite for fridge or freezer storage: if you store it in an airtight mason jar or other storage it’ll last 4-5 days in the fridge (I usually have it in there longer, you can sniff it before use and if it smells off it probably went bad) and in the freezer it can last up to 6 months
- Ice cube trays: I love these if you want to add a little bit of nourishment to a recipe instead of a large amount of bone broth. I’ll freeze the broth in ice cube trays and then pop them out and put them in a reusable ziplock bag and label them with name and date
- Soup-er Cubes! If you don’t have these and you like to have a stock pile of food in your freezer, these are game changing! They freeze in single serving blocks that you can also pop out and put in some sort of container or ziplock (like I linked above) and label/date. When you’re ready to use them you can either microwave, heat up on the stove, add to whatever your cooking, or whatever way you want to reheat them! They have quite a few serving size options, I usually use half a cup but do what works for you!
Other things you can add to your Bone Broth to Enhance it!
- Ginger! This is an ingredient I see a lot getting added in with turmeric. It has amazing anti-inflammatory properties that would pair amazingly with this recipe. You could either add a teaspoon of powdered ginger or wash a medium size piece of ginger and roughly chop it up into a couple pieces and throw it in with the rest of the bone broth ingredients
- Lemon- this is a great way to add a light citrus note to your broth. I usually replace the carrots with lemon if I’m going this route and just cut a (washed) lemon or two in half and put it in the pot with the rest of the ingredients
- Different spices and herbs- if you have any fresh herbs that need to be used up bone broth is the perfect opportunity to use them up! Fresh herbs are a great way to enhance your flavor and add different benefits depending on the herb. As for spices, I’m all for playing with your recipes and customizing them to your taste! If you like things to taste a little more spicy or smoky add a little bit of your favorite seasonings and tweak as you try the recipe more! Have fun with it
Notes
- Turmeric! I use 2 Teaspoons of turmeric powder, however, if you’re prone to heartburn going down to 1 teaspoon of turmeric powder might be helpful. While bone broth can help with heartburn because it helps heal the lining of your gut, before anything is healed the turmeric itself could cause bad heartburn. You can always up the dosage when you feel confident! Also, if you have fresh turmeric you can always substitute it for the powder. I will usually wash the turmeric and roughly chop it up and throw about half a cup (give or take) of it in to the pot
- Black pepper! Black pepper has been shown to assist in turmeric absorption. It’s part of the recipe but if you want to have extra assurance the turmeric will absorb like you want it, you could add a little extra black pepper to the finished product
Chicken Bone Broth with Turmeric
Difficulty: Easy30
minutes2
hoursIngredients
2-3 Pounds of chicken bones (see notes)
1-2 whole onions cut in half
1-2 whole garlic bulbs cut in half
2-4 whole carrots cut in half or roughly chopped
2-4 stalks of celery cut in half or roughly chopped
2 tsp turmeric powder
1 tsp of salt
1 tsp pepper
1 tsp oregano
1 tablespoon apple cider vinegar
Cold filtered water
Optional: bundles of fresh herbs like parsley, sage, rosemary, etc
Directions
Place your chicken bones in your pressure cooker pot (see notes for other forms of cooking) along with your onions, garlic, carrots, celery, seasonings/herbs and apple cider vinegar. Make sure everything does not rise above your max capacity marker.
Once all of that is in your pot, fill it with cold filtered water until it hits one inch below the max capacity mark.
After you’ve filled it with water and all the ingredients are in, secure your pressure cookers lid. Once secured, set your pressure cooker to high and set it’s timer for 2 hours. Note: take into account the time it takes for your pressure cooker to pre heat and to release the pressure in order to open the lid again— although your timer is set for 2 hours it really takes about 3 altogether.
Once its cooked for the 2 hours and the pressure cooker has released the pressure needed to open the lid, then you can strain it. Note: I prefer opening the top and letting it cool off for 30 minutes for an hour before handling the hot liquid. To Strain: I securely fasten a mesh metal strainer on top of a large glass or stainless steal bowl (see notes) and use oven mitts to lift the pot and pour it over the mesh strainer and into the bowl.
Extra step: sometimes there will be seasonings that will not come out with the mesh strainer— if you want a really clear broth you can do this step again with a cheese cloth on top of the mesh strainer. Note: a clear broth won’t make a difference for efficacy, but I know its preferred sometimes.
Storage: Once strained choose how you’d like to store— I will personally divvy up mine by putting half in a mason jar that will go into the fridge (once fully cooled) for 4-5 days and the other half I freeze (see notes).- Enjoy!